Top 5 Desserts To Make This Spring Simple, Colorful, and tasty!
This post includes some affiliate links, which means I may earn a small commission if you purchase through them at no extra charge to you.
These are my top 5 favorite spring desserts and they’re the ones I find myself coming back to every year when the weather starts to warm up and I want something that feels a little lighter, brighter, and more fun to make. They all have that balance of being simple but still special, which is exactly what I look for this time of year.
There’s a mix of everything in here. The lemon blondies are soft and buttery with that fresh citrus flavor and a light glaze on top. The blueberry cinnamon rolls have that cozy, pillowy texture but with a jammy blueberry lemon swirl that makes them feel more seasonal. The orange posset is smooth and creamy with a softer citrus flavor that sets into the prettiest little dessert with barely any effort. And the hydrangea cupcakes are one of my favorite ways to turn any basic cupcake into something that looks really thoughtful and detailed just by how you pipe the frosting.
Each one brings something a little different, but they all feel like spring to me. They’re the kind of desserts you make when you want your kitchen to feel full, when you want something sweet that isn’t too heavy, or when you just want to try something new without it being complicated.
If you’re looking for a few go-to desserts to carry you through the season, these are the ones I’d start with.
Lemon Posset
I love love love Lemon Posset! I have made this recipe for friends at least 20 times and we rarely have leftovers. Lemon Posset only takes around 15 minutes to make and yet, it feels so elevated. It is creamy, tangy, & fresh! Lemon Posset tastes like a lemon pudding! It is truly one of the best desserts to make during spring and summer.
Ingredients
For the lemon posset
2 cups heavy cream
¾ cup granulated sugar
Zest of 1 lemon
5 tablespoons fresh lemon juice (about 1–2 lemons)
How to Make It
In a medium saucepan, combine the cream, sugar, and lemon zest.
Bring it to a gentle boil over medium heat, stirring so nothing sticks.Once it starts boiling, let it simmer for 3 minutes, stirring occasionally.
This part is important.Remove from heat and stir in the lemon juice.
You’ll notice it thicken slightly right away.Strain the mixture to remove the zest, then pour into small glasses or ramekins.
Chill in the fridge for at least 3 hours, or until fully set. Overnight is even better.
Make these with me!
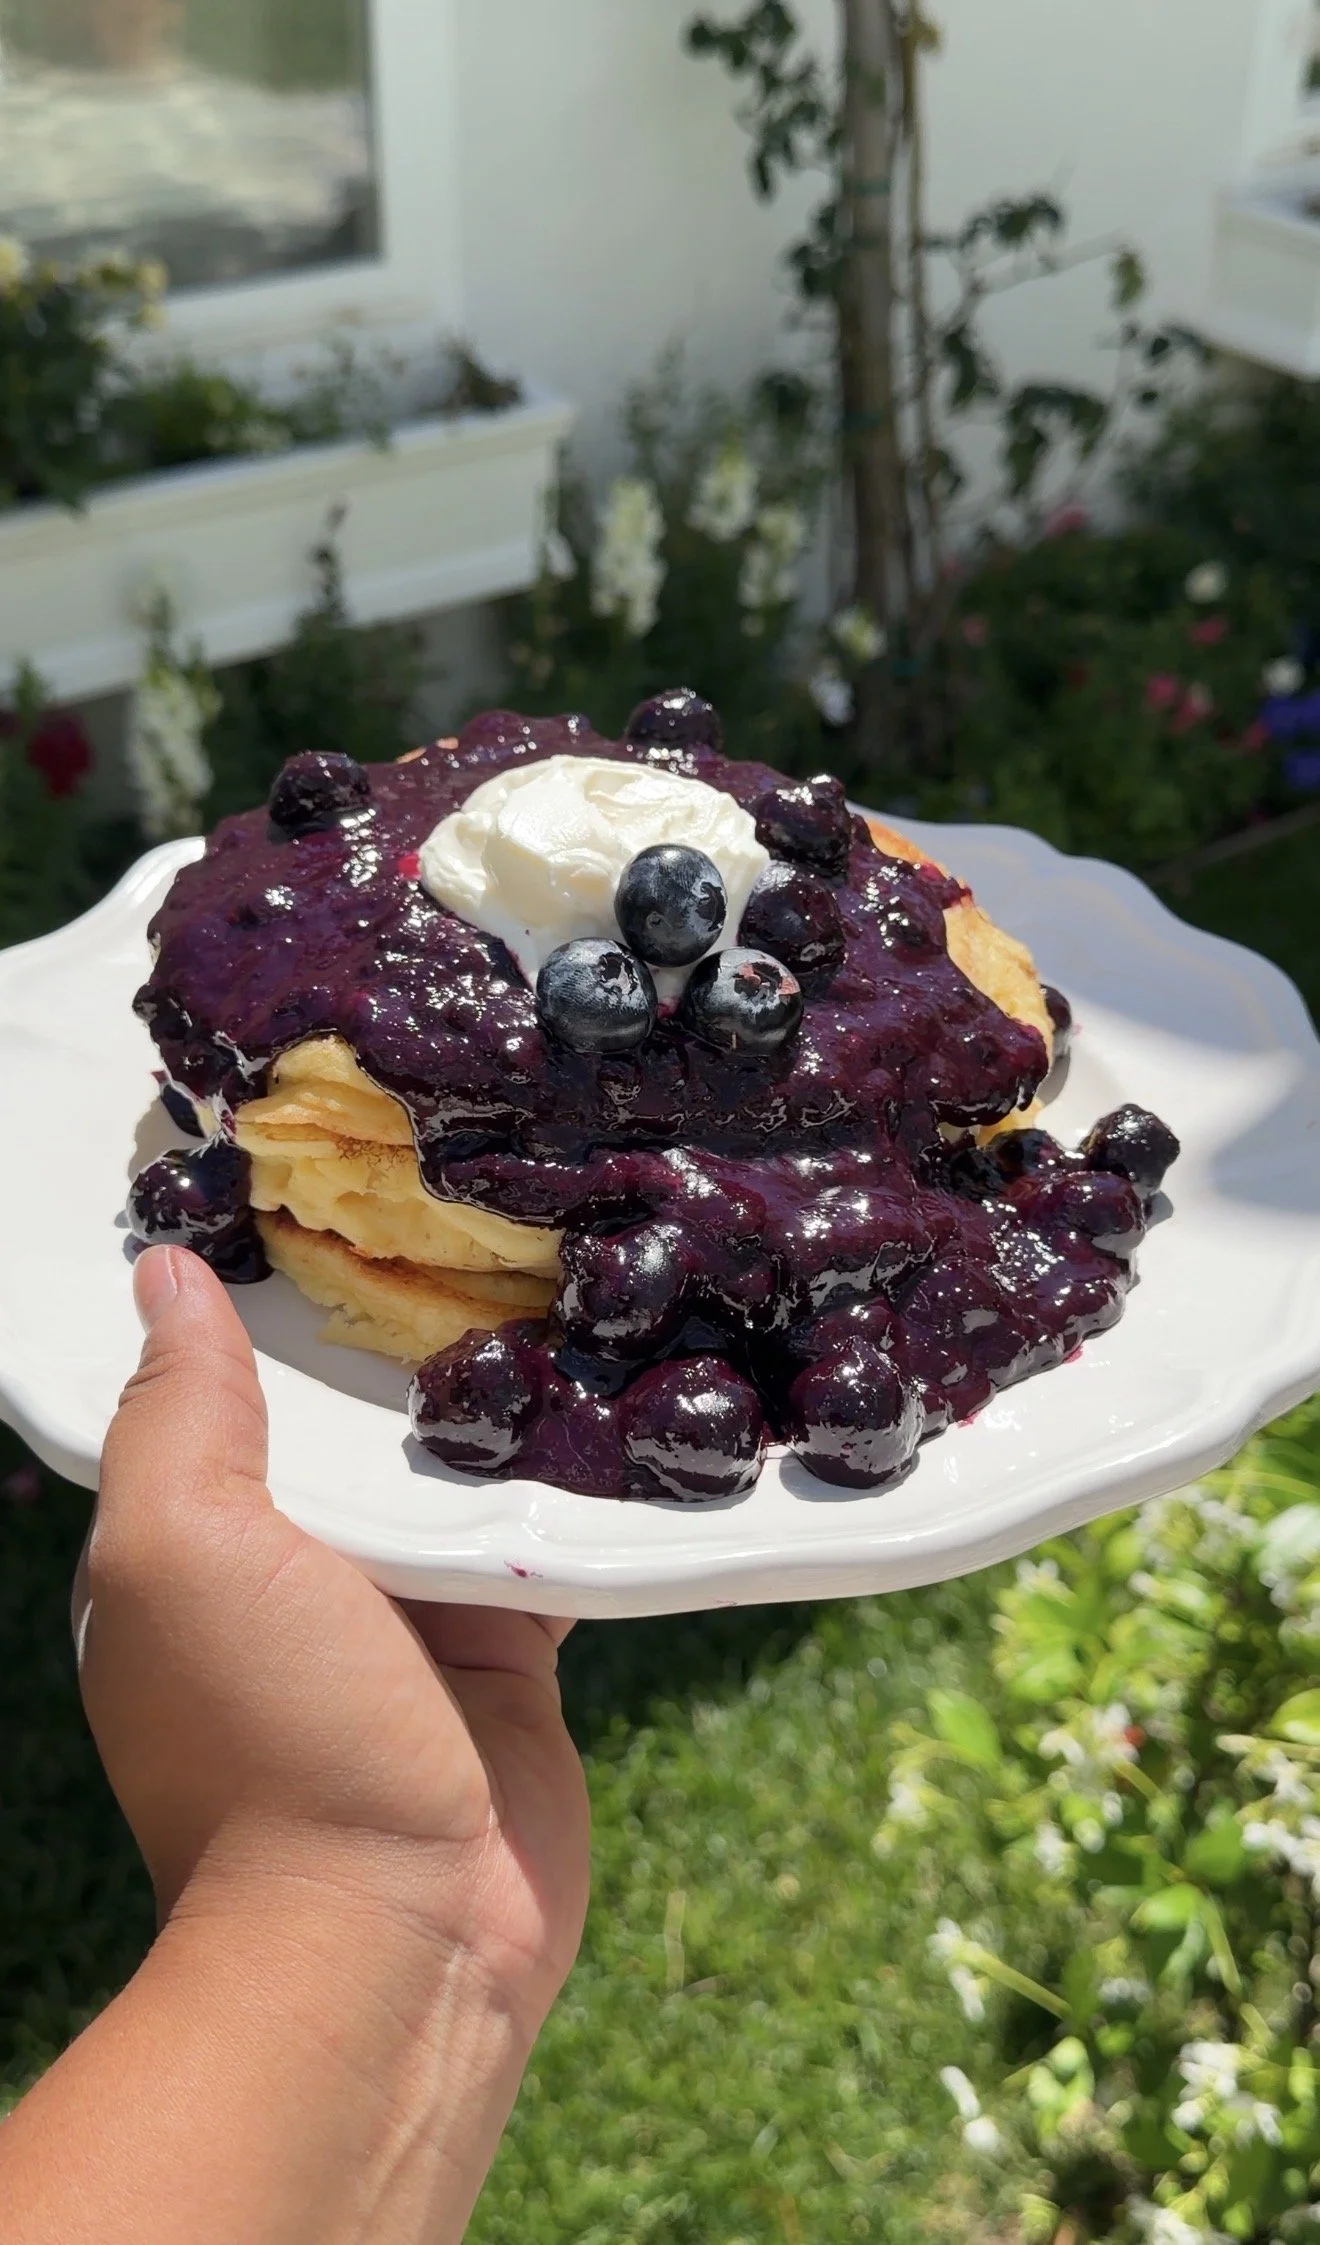
Blueberry Cinnamon Rolls Layered with a jammy blueberry lemon swirl
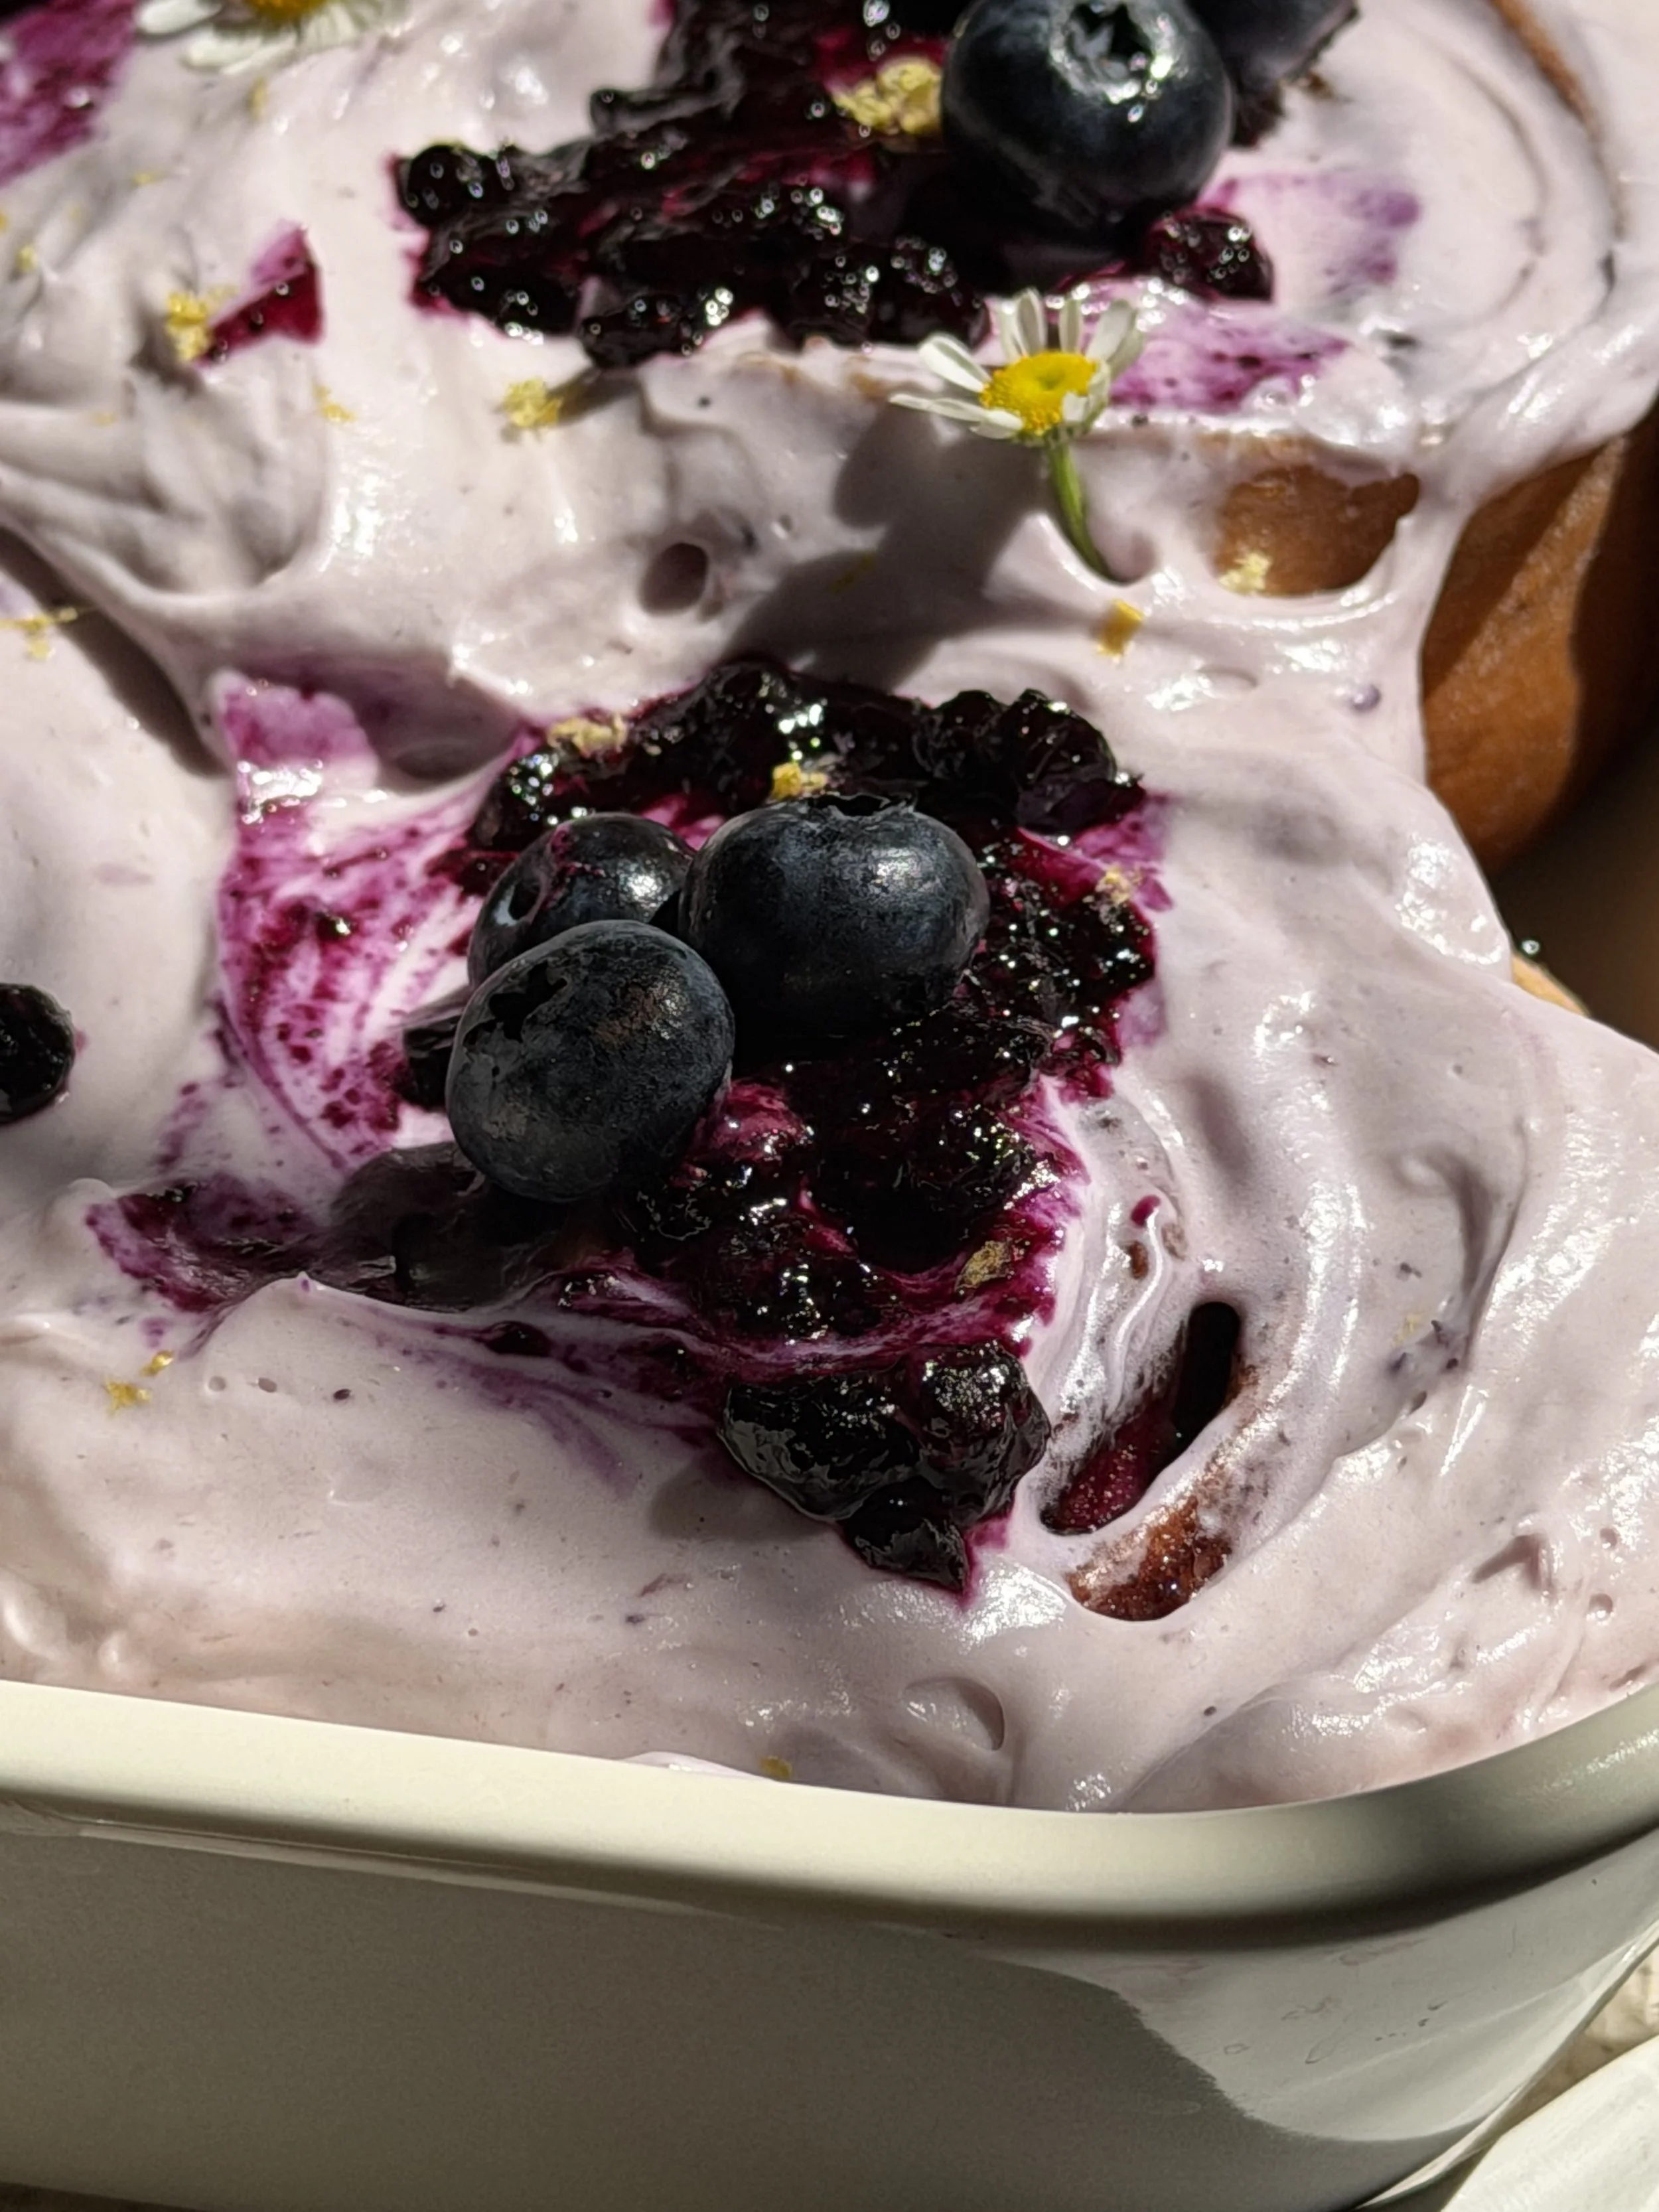
These blueberry cinnamon rolls are the kind of recipe that feels like a slow morning at home. They’re soft, warm, and layered with a jammy blueberry lemon swirl that melts into every bite. It’s that balance of sweet and bright that makes them feel a little more special than your classic cinnamon roll, but still just as comforting.
The filling is where everything changes. Instead of just cinnamon and sugar, the blueberries cook down into this rich, jam-like layer with fresh lemon that cuts through the sweetness and adds a subtle brightness. As the rolls bake, that swirl settles into the dough and creates these pockets of soft, gooey fruit that almost taste like a cross between a cinnamon roll and a blueberry pastry.
They’re the kind of thing you make when you want your home to feel full. The smell alone is enough to make people wander into the kitchen, and once they’re out of the oven, they don’t last long. I love making these for slow weekends, spring mornings, or when I’m hosting and want something that feels thoughtful but still easy to share.
What I love most about this recipe is how it feels familiar but a little elevated. You still get that soft, pillowy dough and cozy cinnamon flavor, but the blueberry lemon swirl adds just enough brightness to make it feel fresh and seasonal. It’s simple, it’s beautiful, and it’s one of those recipes that makes people pause after the first bite.
Ingredients
For the blueberry cinnamon rolls layered with a jammy blueberry lemon swirl
For the Rolls:
1 cup milk, warm to the touch (not too hot)
2 1/4 tsp active dry yeast
1 large egg, room temperature
1 Tbsp melted butter
4 Tbsp granulated sugar
1/2 tsp salt
3 cups all-purpose flour
3/4 cup heavy cream (for pouring over rolls before baking)
For the Blueberry Filling (Compote):
2 cups frozen wild blueberries
1/2 cup granulated sugar
1 Tbsp lemon juice
1 Tbsp cornstarch
1 Tbsp water
1 tsp vanilla extract
pinch of salt
For the Cinnamon Sugar Filling:
6 Tbsp softened butter
1 cup brown sugar
1 Tbsp ground cinnamon (or pumpkin pie spice)
1 Tbsp molasses
For the Blueberry Cream Cheese Frosting:
6 Tbsp softened butter
8 oz softened cream cheese
2 tsp vanilla extract
1 cup powdered sugar
3 Tbsp blueberry compote
For Topping:
Reserved blueberry compote
Fresh blueberries
Lemon zest
Chamomile flowers
Instructions
1. Make the Dough
In a large bowl, whisk together the warm milk, yeast, egg, melted butter, sugar, and salt.
Add flour and mix until a dough forms. If sticky, add a little more flour as needed.
Knead for about 4 minutes until soft and slightly tacky.
Cover and let rise in a warm place for 1 hour, or until doubled.
2. Make the Blueberry Compote
In a saucepan over medium heat, combine blueberries, sugar, and lemon juice.
Cook for 4–5 minutes until the berries burst.
Stir in the cornstarch slurry (cornstarch + water) and cook until thick and jam-like.
Remove from heat, add vanilla + salt, and let cool completely.
Set aside a few tablespoons for frosting + topping.
3. Make the Cinnamon Filling
In a bowl, mix together softened butter, brown sugar, cinnamon, and molasses until smooth and spreadable.
4. Roll + Layer
Roll dough into a rectangle on a floured surface.
First, spread the cinnamon sugar filling evenly across the dough.
Then gently spread a layer of the cooled blueberry compote on top.
Don’t overdo the compote! a thin layer prevents leaking.
Roll the dough up lengthwise into a tight log and cut into 8 rolls.
5. Second Rise
Place rolls in a greased 9×13 pan.
Cover and let rise for 30 minutes.
Pour heavy cream evenly over the rolls.
6. Bake
Bake at 350°F for 25–30 minutes, until lightly golden and cooked through.
If browning too fast, loosely cover with foil.
Cool for 5–10 minutes.
7. Make the Frosting
Beat butter, cream cheese, and vanilla until smooth.
Add powdered sugar and mix until creamy.
Fold in 3 Tbsp blueberry compote for a light swirl.
8. Finish
Spread frosting over warm rolls.
Spoon over a little extra blueberry compote and swirl.
Top with fresh blueberries, lemon zest, and chamomile flowers.
Make this with me!
Lemon Blondies
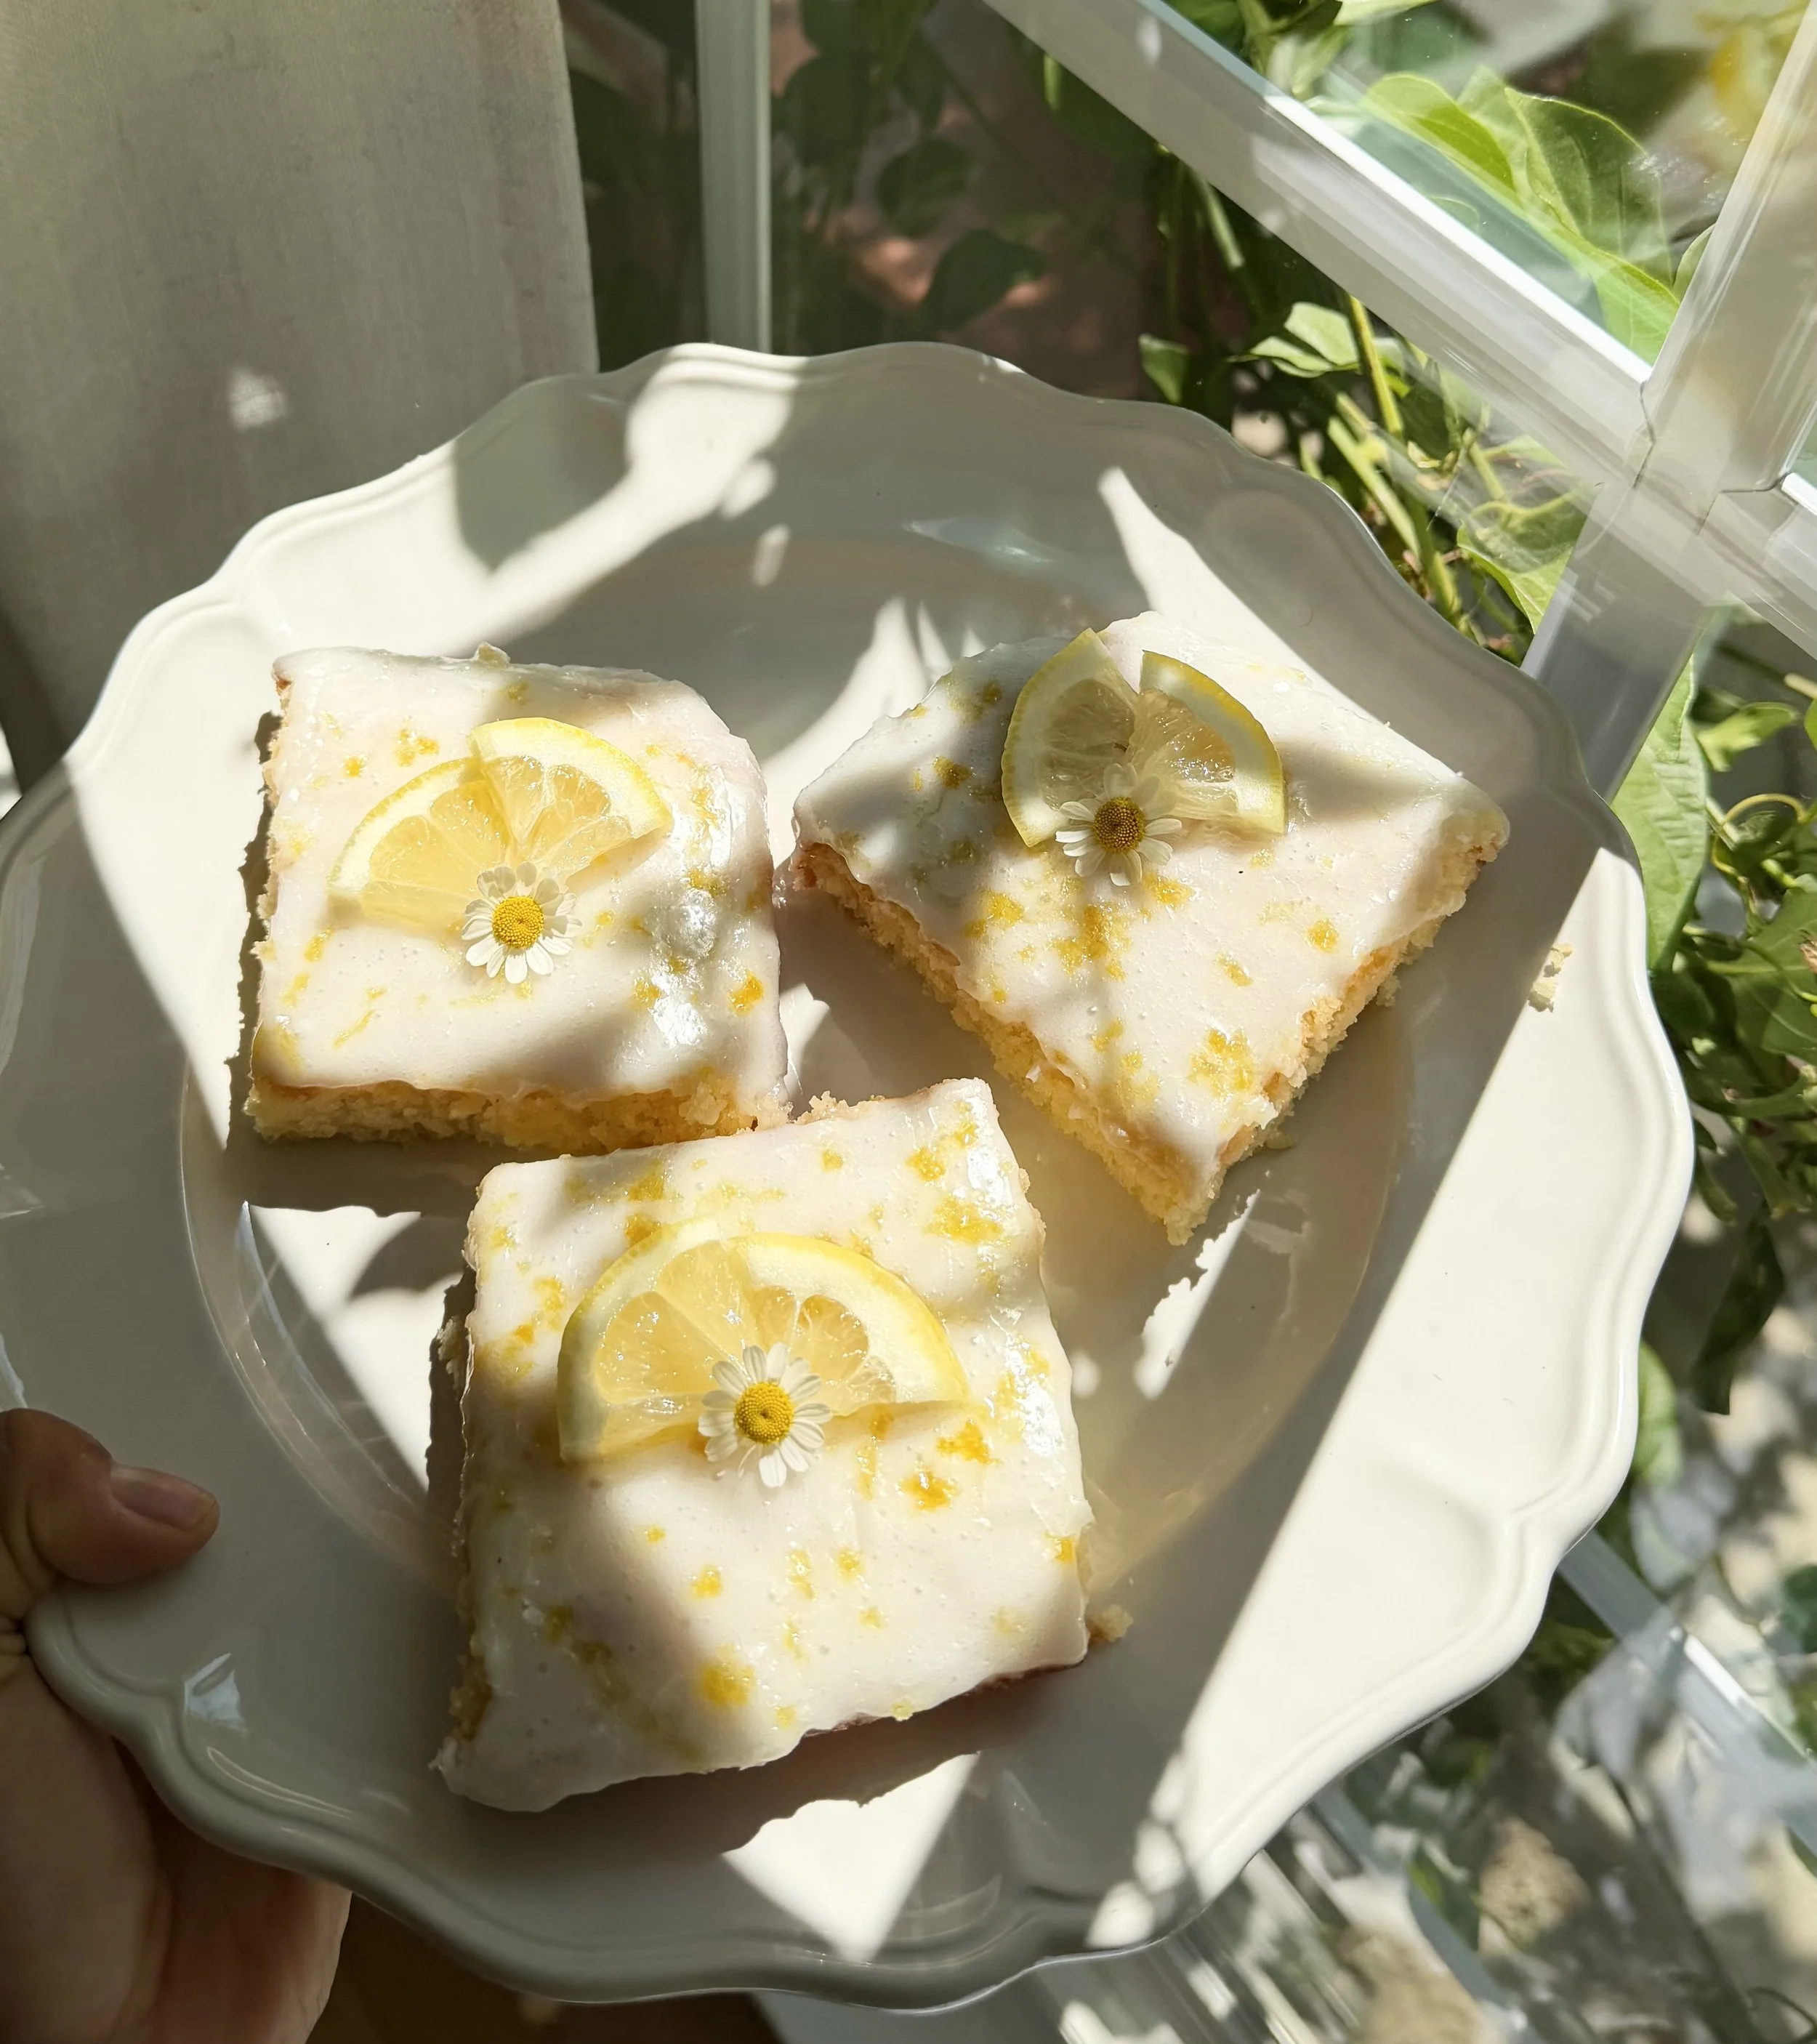
These lemon blondies are soft, buttery, and filled with that bright, fresh lemon flavor that makes them feel light but still really satisfying. They have that classic blondie texture with a slightly dense, chewy center and delicate edges, but the lemon takes them in a completely different direction than your typical dessert bar.
The white chocolate melts into the batter as they bake, adding a subtle sweetness that balances the tartness from the lemon. It’s not overpowering, just enough to round everything out so each bite feels smooth and layered. The zest and fresh lemon juice bring a natural brightness that makes these feel perfect for spring or anytime you want something that isn’t too heavy.
What I love about these is how simple they are to make but how elevated they feel once they’re finished. They come together in one bowl, no complicated steps, and they bake into these soft, golden bars that look just as good as they taste. Once they’ve cooled, the lemon glaze sets right on top and adds that extra pop of sweetness and shine.
They’re the kind of dessert you make when you want something easy but still a little special. Perfect for sharing, bringing to a gathering, or just having in your kitchen when you want something sweet that feels fresh and comforting at the same time.
Ingredients
For the Lemon Blondies
1/2 cup unsalted butter
4 oz Lindt white chocolate, chopped
3/4 cup granulated sugar
2 1/2 Tbsp lemon zest
2 large eggs, room temperature
1 large egg yolk, room temperature
1 tsp vanilla extract
1 tsp lemon extract
3 Tbsp fresh lemon juice
1 cup + 3 Tbsp all purpose flour
1/2 tsp salt
a pinch of baking powder
For the Lemon Glaze
1 cup powdered sugar
2 to 3 Tbsp fresh lemon juice
Instructions
1. Prep
Preheat your oven to 350°F. Line an 8x8 pan with parchment paper, leaving a little overhang so you can lift them out later.
2. Melt the butter and chocolate
In a heat safe bowl, melt the butter and white chocolate together until smooth. You can do this in the microwave in short increments or over a double boiler.
Let it cool slightly so it’s warm but not hot.
3. Build the lemon base
In a large bowl, rub the lemon zest into the sugar with your fingers. This helps release the oils and gives you a stronger lemon flavor.
Whisk in the melted butter and chocolate until smooth.
4. Add the eggs
Add the eggs and egg yolk and whisk until the mixture is smooth and slightly glossy.
5. Add flavor
Mix in the vanilla extract, lemon extract, and fresh lemon juice.
6. Add dry ingredients
In a separate bowl, whisk together the flour, salt, and baking powder.
Add to the batter and mix gently until just combined. Do not overmix.
7. Bake
Pour the batter into your prepared pan and spread evenly.
Bake for 22 to 26 minutes, until the edges are set and the center is just slightly soft.
8. Cool
Let the blondies cool completely in the pan before glazing. This is what gives them that soft, dense texture.
9. Make the glaze
Whisk together the powdered sugar and lemon juice until smooth. Start with 2 tablespoons and add more as needed.
10. Finish
Pour the glaze over the blondies and spread evenly. Let it set slightly before slicing.
Make this with me!
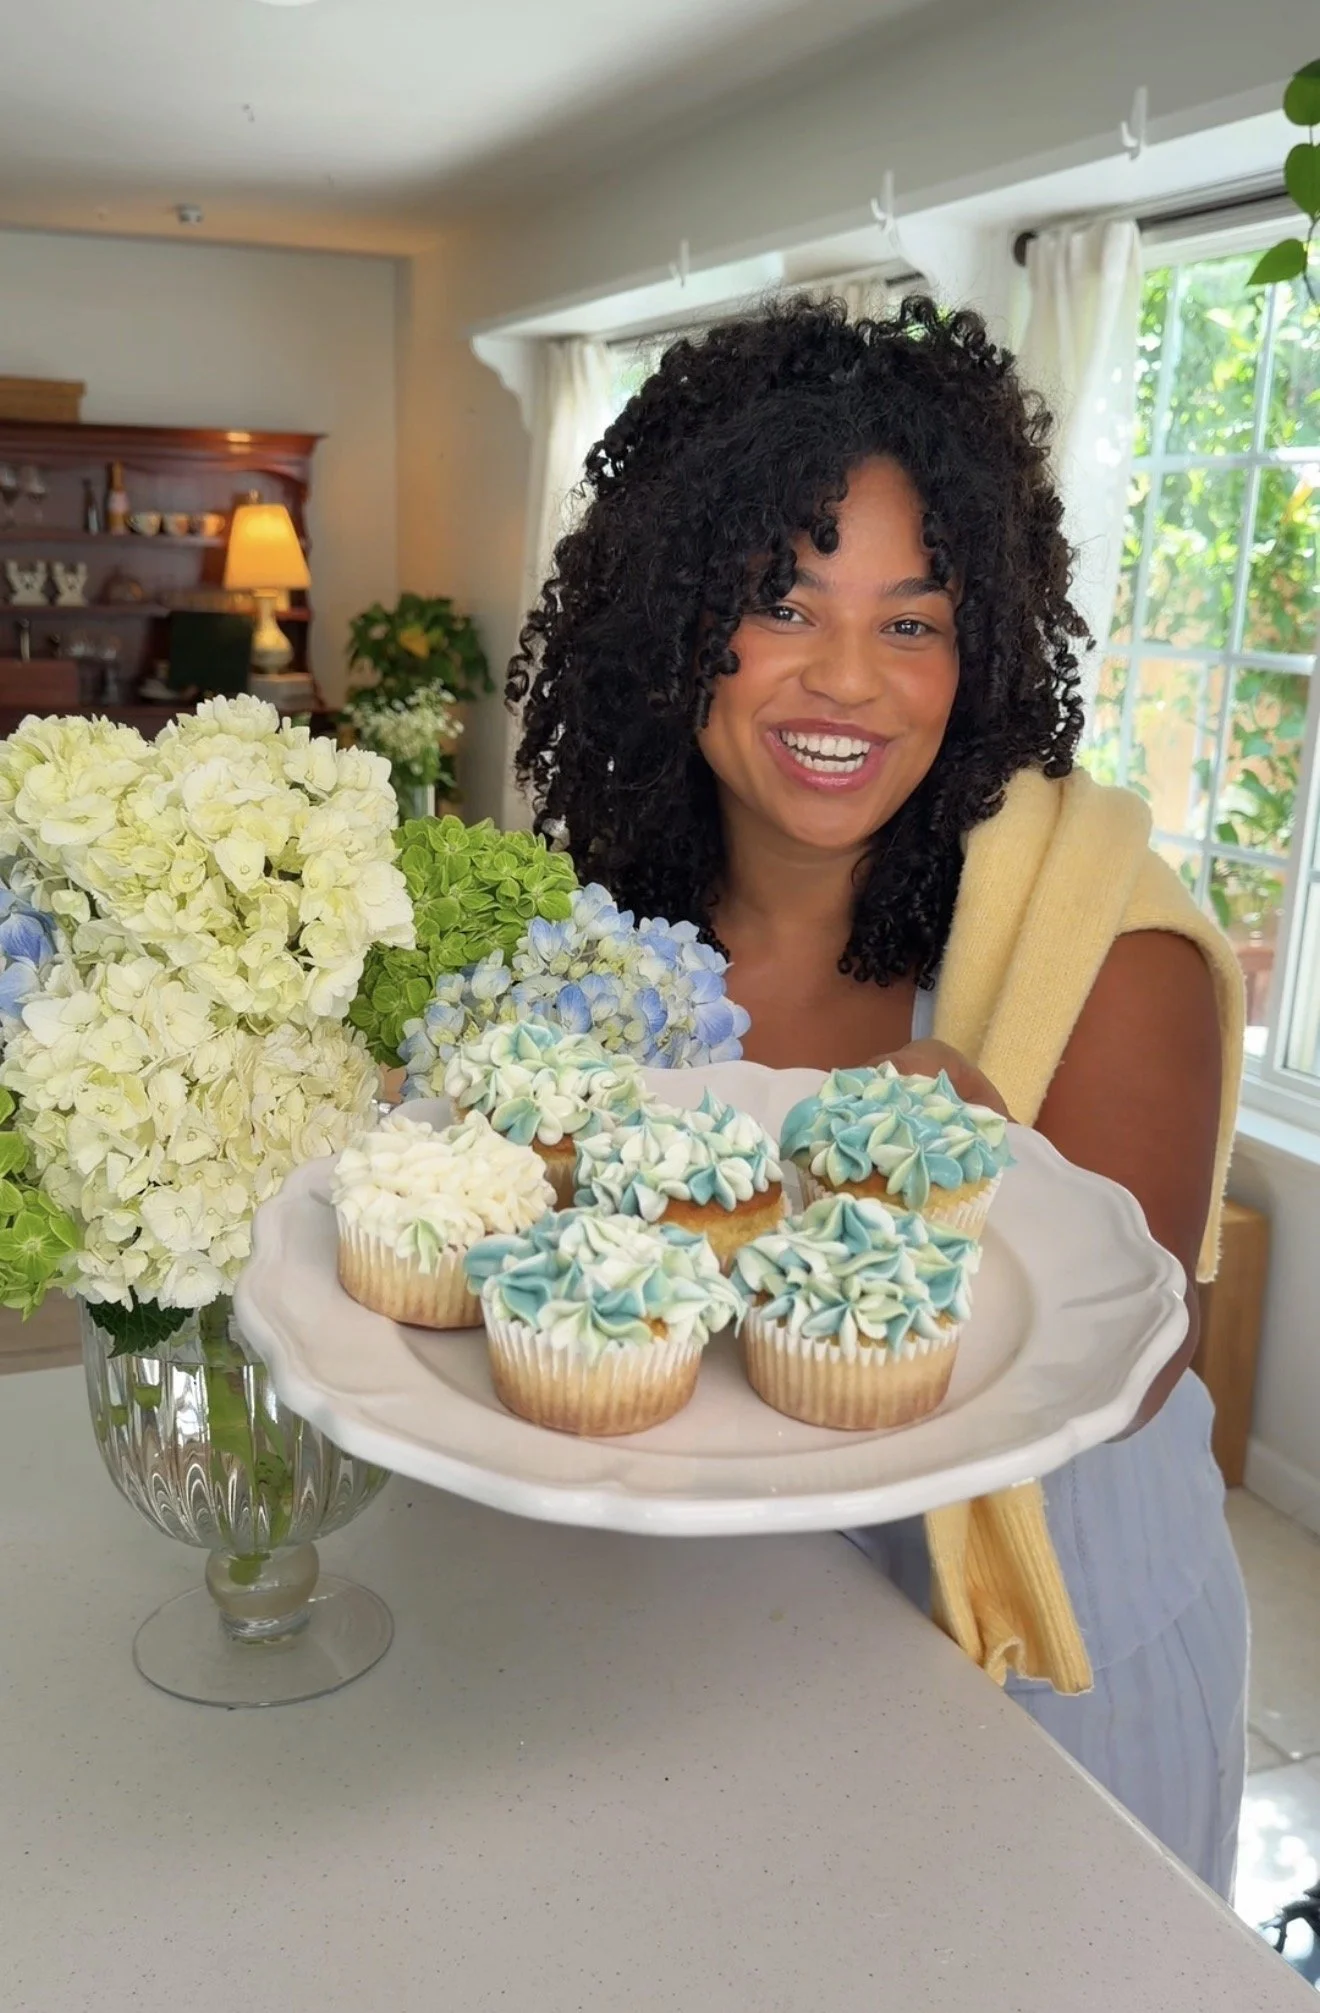
Hydrangea Cupcakes
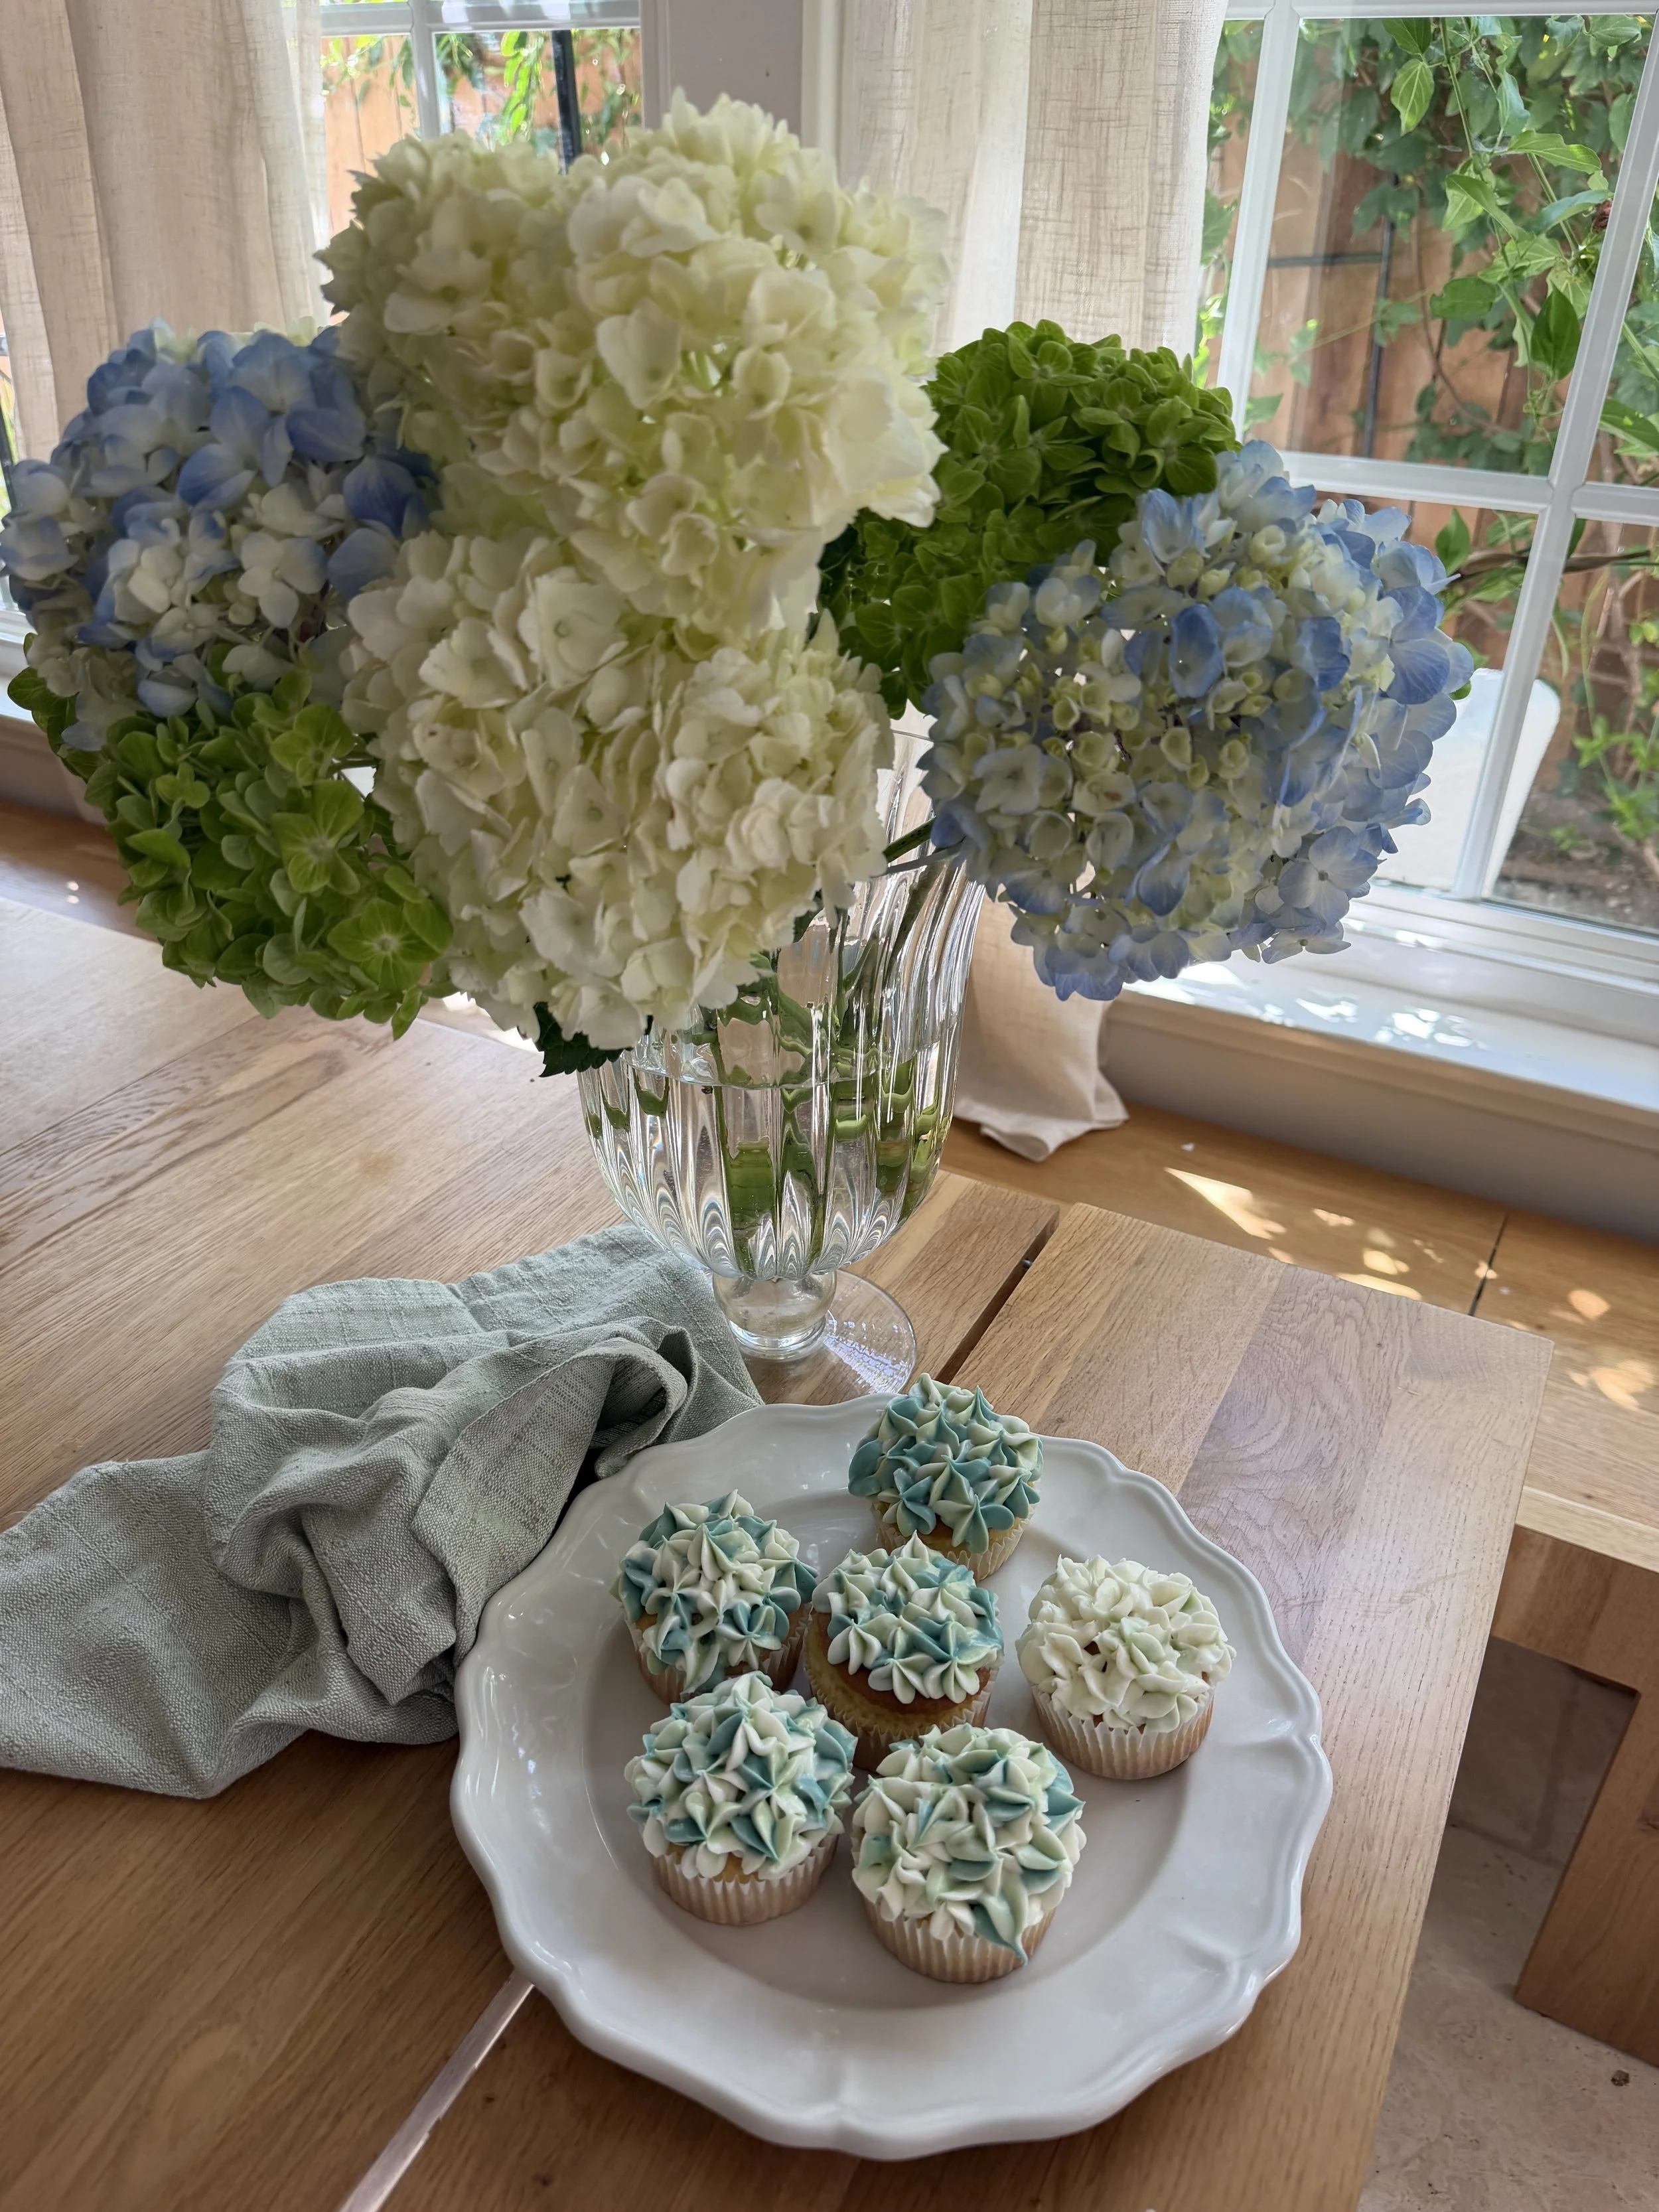
These hydrangea cupcakes are one of my favorite ways to make something simple feel really special. They look super detailed, but it’s really just buttercream piped in a way that creates that soft, floral texture.
I love that you can use any cupcake base you want and completely change the feel just with the frosting. When you add a few different shades into one piping bag, they blend together as you pipe and give that natural hydrangea look without needing it to be perfect.
They’re really pretty for things like baby showers, bridal showers, or spring gatherings, but they’re also just fun to make when you want something that looks a little more elevated without being complicated. It’s one of those small details that makes everything feel a bit more thoughtful.
What You’ll Need
For hydrangea cupcakes
12 cupcakes (any flavor, fully cooled)
Vanilla buttercream frosting (recipe below)
Gel food coloring (2–3 shades like purple, blue, pink, or white)
Piping bags
1M or 2D piping tip (open star tip)
Scissors
Vanilla Buttercream Frosting (Perfect for Piping)
This buttercream is smooth, easy to work with, and holds its shape really well. It is perfect for piping the soft, clustered look of hydrangea cupcakes. It’s not overly sweet and comes together in just a few minutes.
Ingredients
1 cup (2 sticks) unsalted butter, softened
3–3 ½ cups powdered sugar
2–3 tablespoons heavy cream (or milk)
1 teaspoon vanilla extract
Pinch of salt
Instructions
In a large bowl, beat the softened butter until smooth and creamy, about 2–3 minutes.
Gradually add the powdered sugar, about 1 cup at a time, mixing on low speed.
Add the vanilla extract and a pinch of salt.
Pour in 2 tablespoons of cream and beat until light and fluffy.
If the frosting feels too thick, add another tablespoon of cream. If it’s too soft, add a little more powdered sugar until it holds its shape.
How to Make Hydrangea Frosting
Divide the buttercream into 2–3 separate bowls.
Tint each bowl a different color using gel food coloring.
Spoon each color side-by-side into one piping bag so they sit next to each other (not mixed).
Gently press the frosting down toward the tip so all colors come through at once.
Tip: Keeping the colors separate is what creates that soft, natural hydrangea look.
How to Pipe the Hydrangea Effect
Hold your piping bag straight up and down over the cupcake.
Pipe small dollops by squeezing, then releasing pressure before lifting up.
Repeat all over the surface of the cupcake until it’s fully covered.
Layer the dollops slightly on top of each other to create that full, flower-like texture.
There’s no perfect pattern just keep piping little clusters and it will naturally come together.
My cake/cupcake decorating starter pack
Everything you need to decorate these cupcakes! My favorite tip to use is Wilton 2D!
Wilton Cake Piping Tips Variety Set: https://amzn.to/4v4OZQN
Piping bags: https://amzn.to/47DIRF4
Tips for the Best Results
Make sure your cupcakes are completely cool before frosting.
Use gel food coloring so the frosting doesn’t get too thin.
You want the frosting soft but structured. It should hold a peak when lifted.
If it’s too soft, add more powdered sugar. If too stiff, add a little cream.
Serving Idea
Arrange them on a cake stand so the colors sit together. It ends up looking like a full bouquet on the table.
Make these with me!
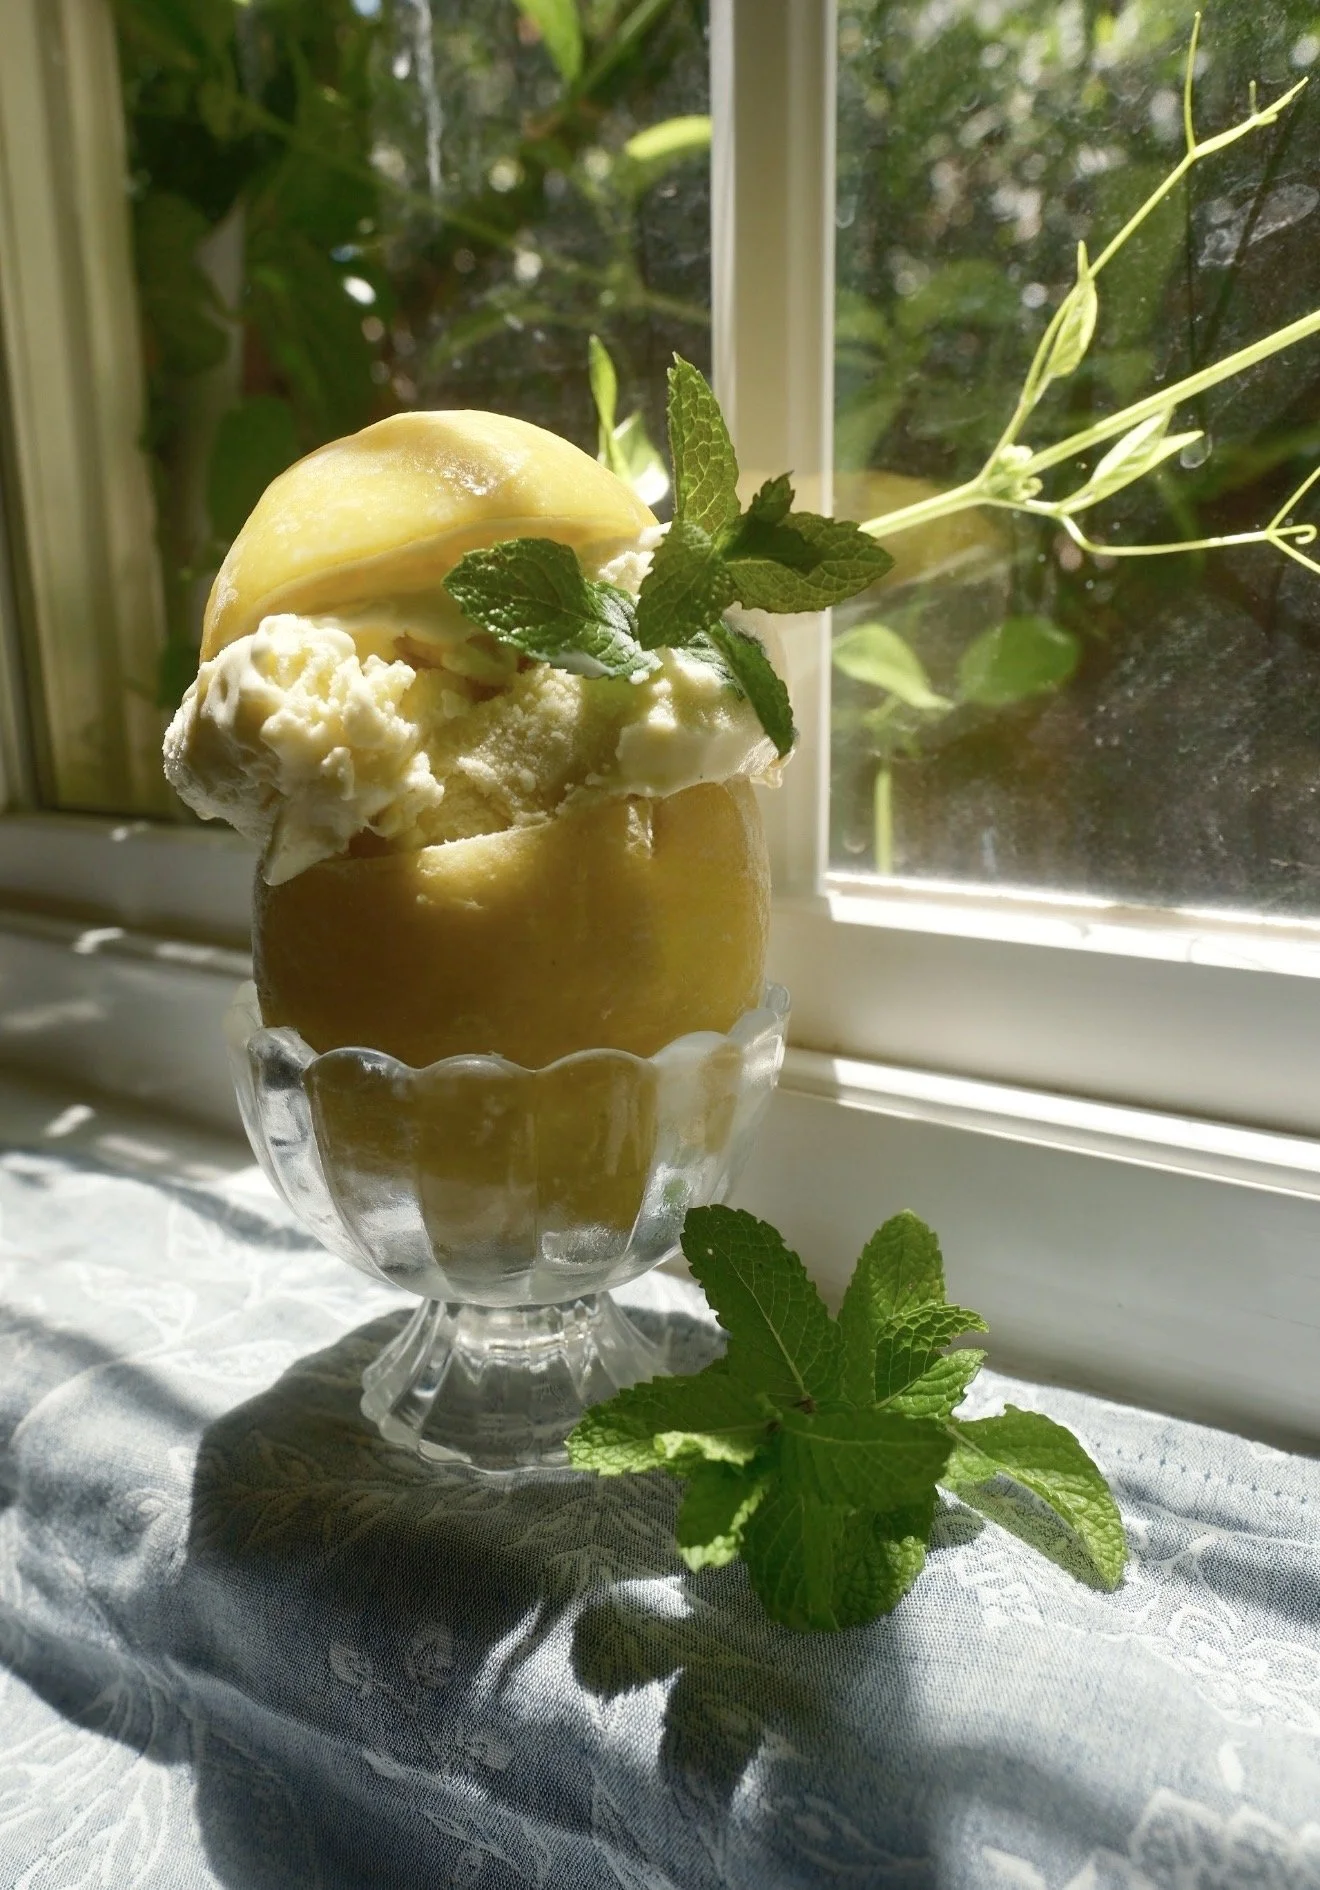
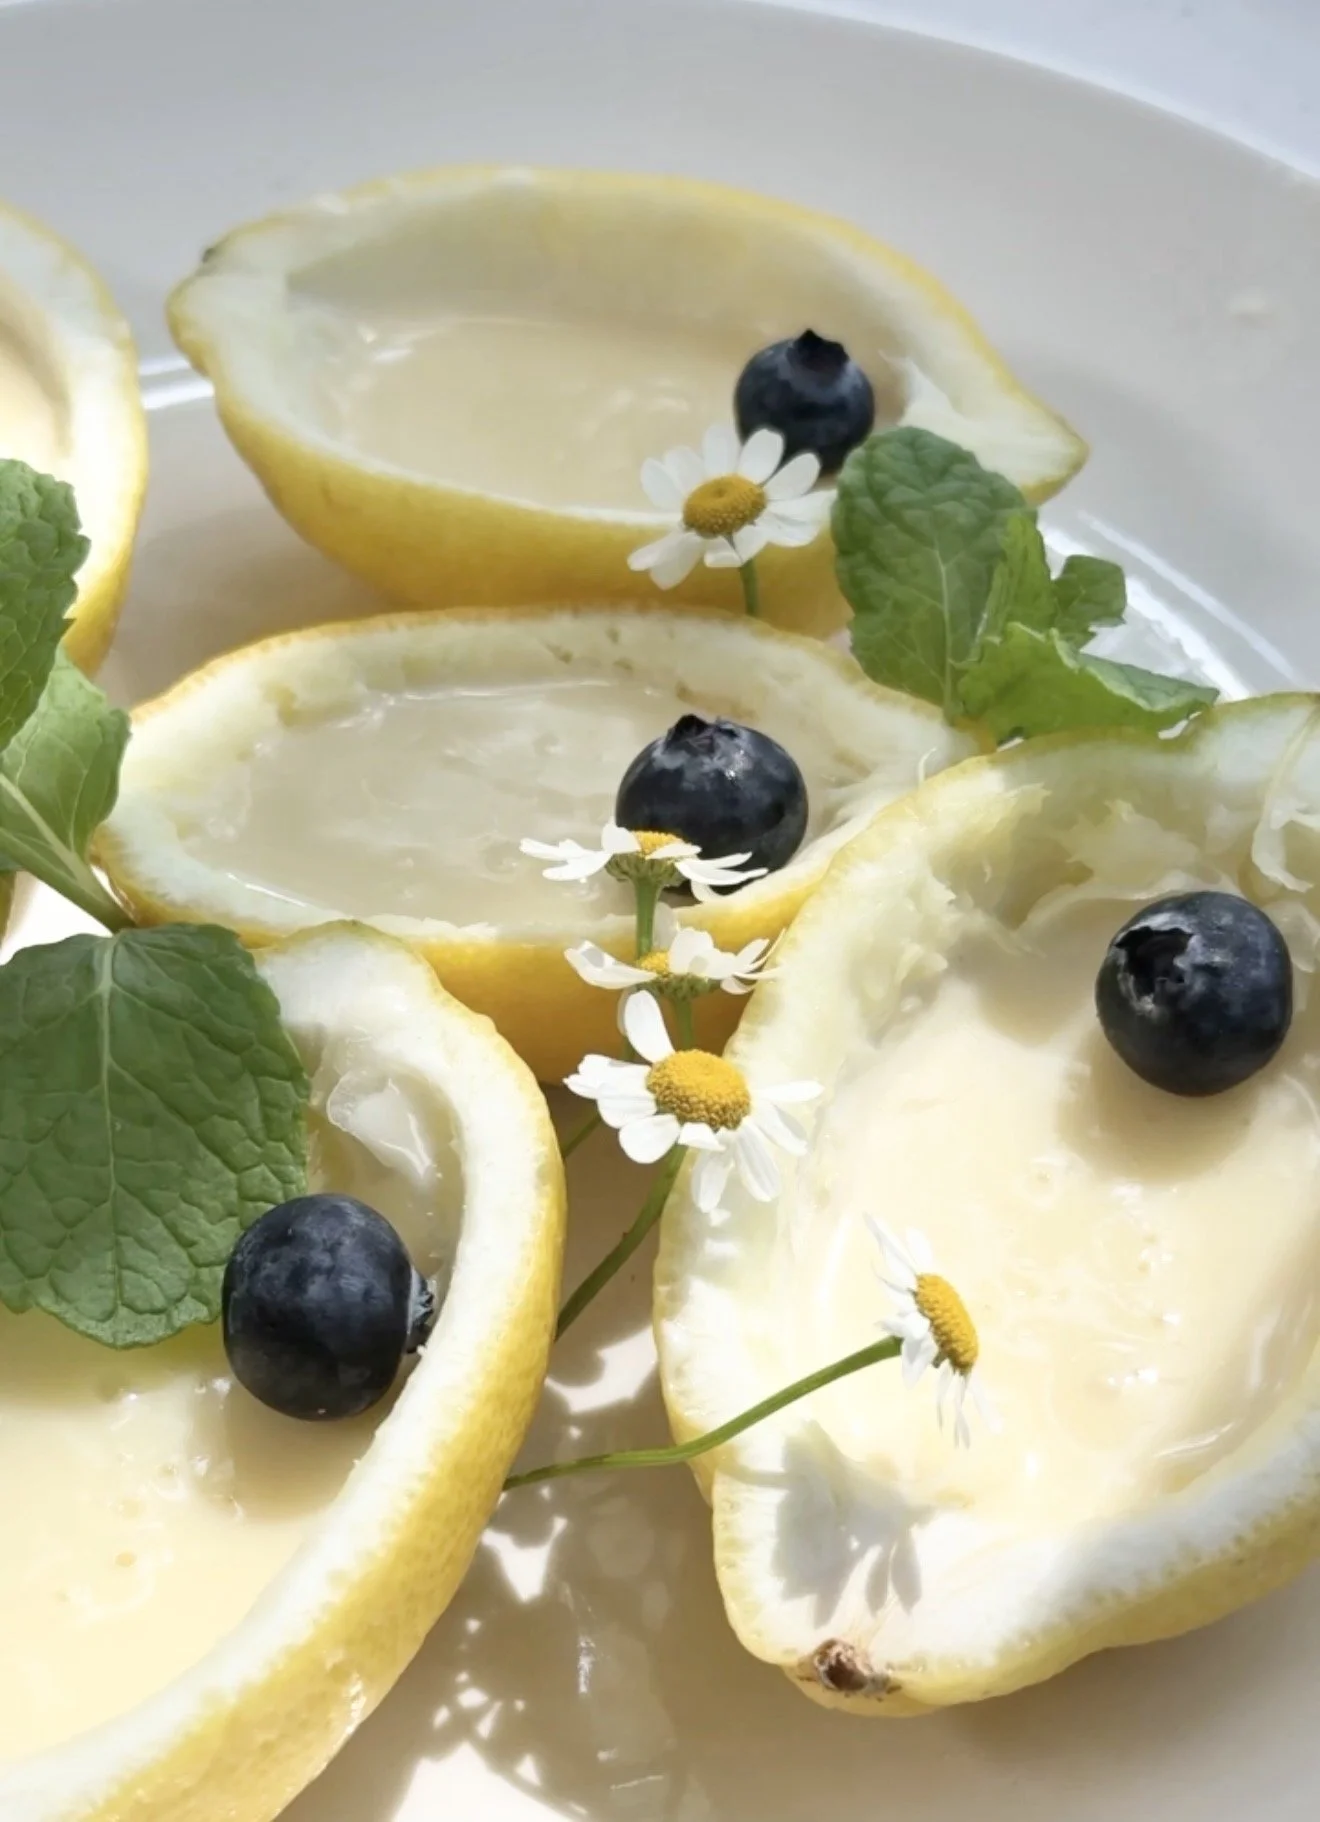
Orange Posset
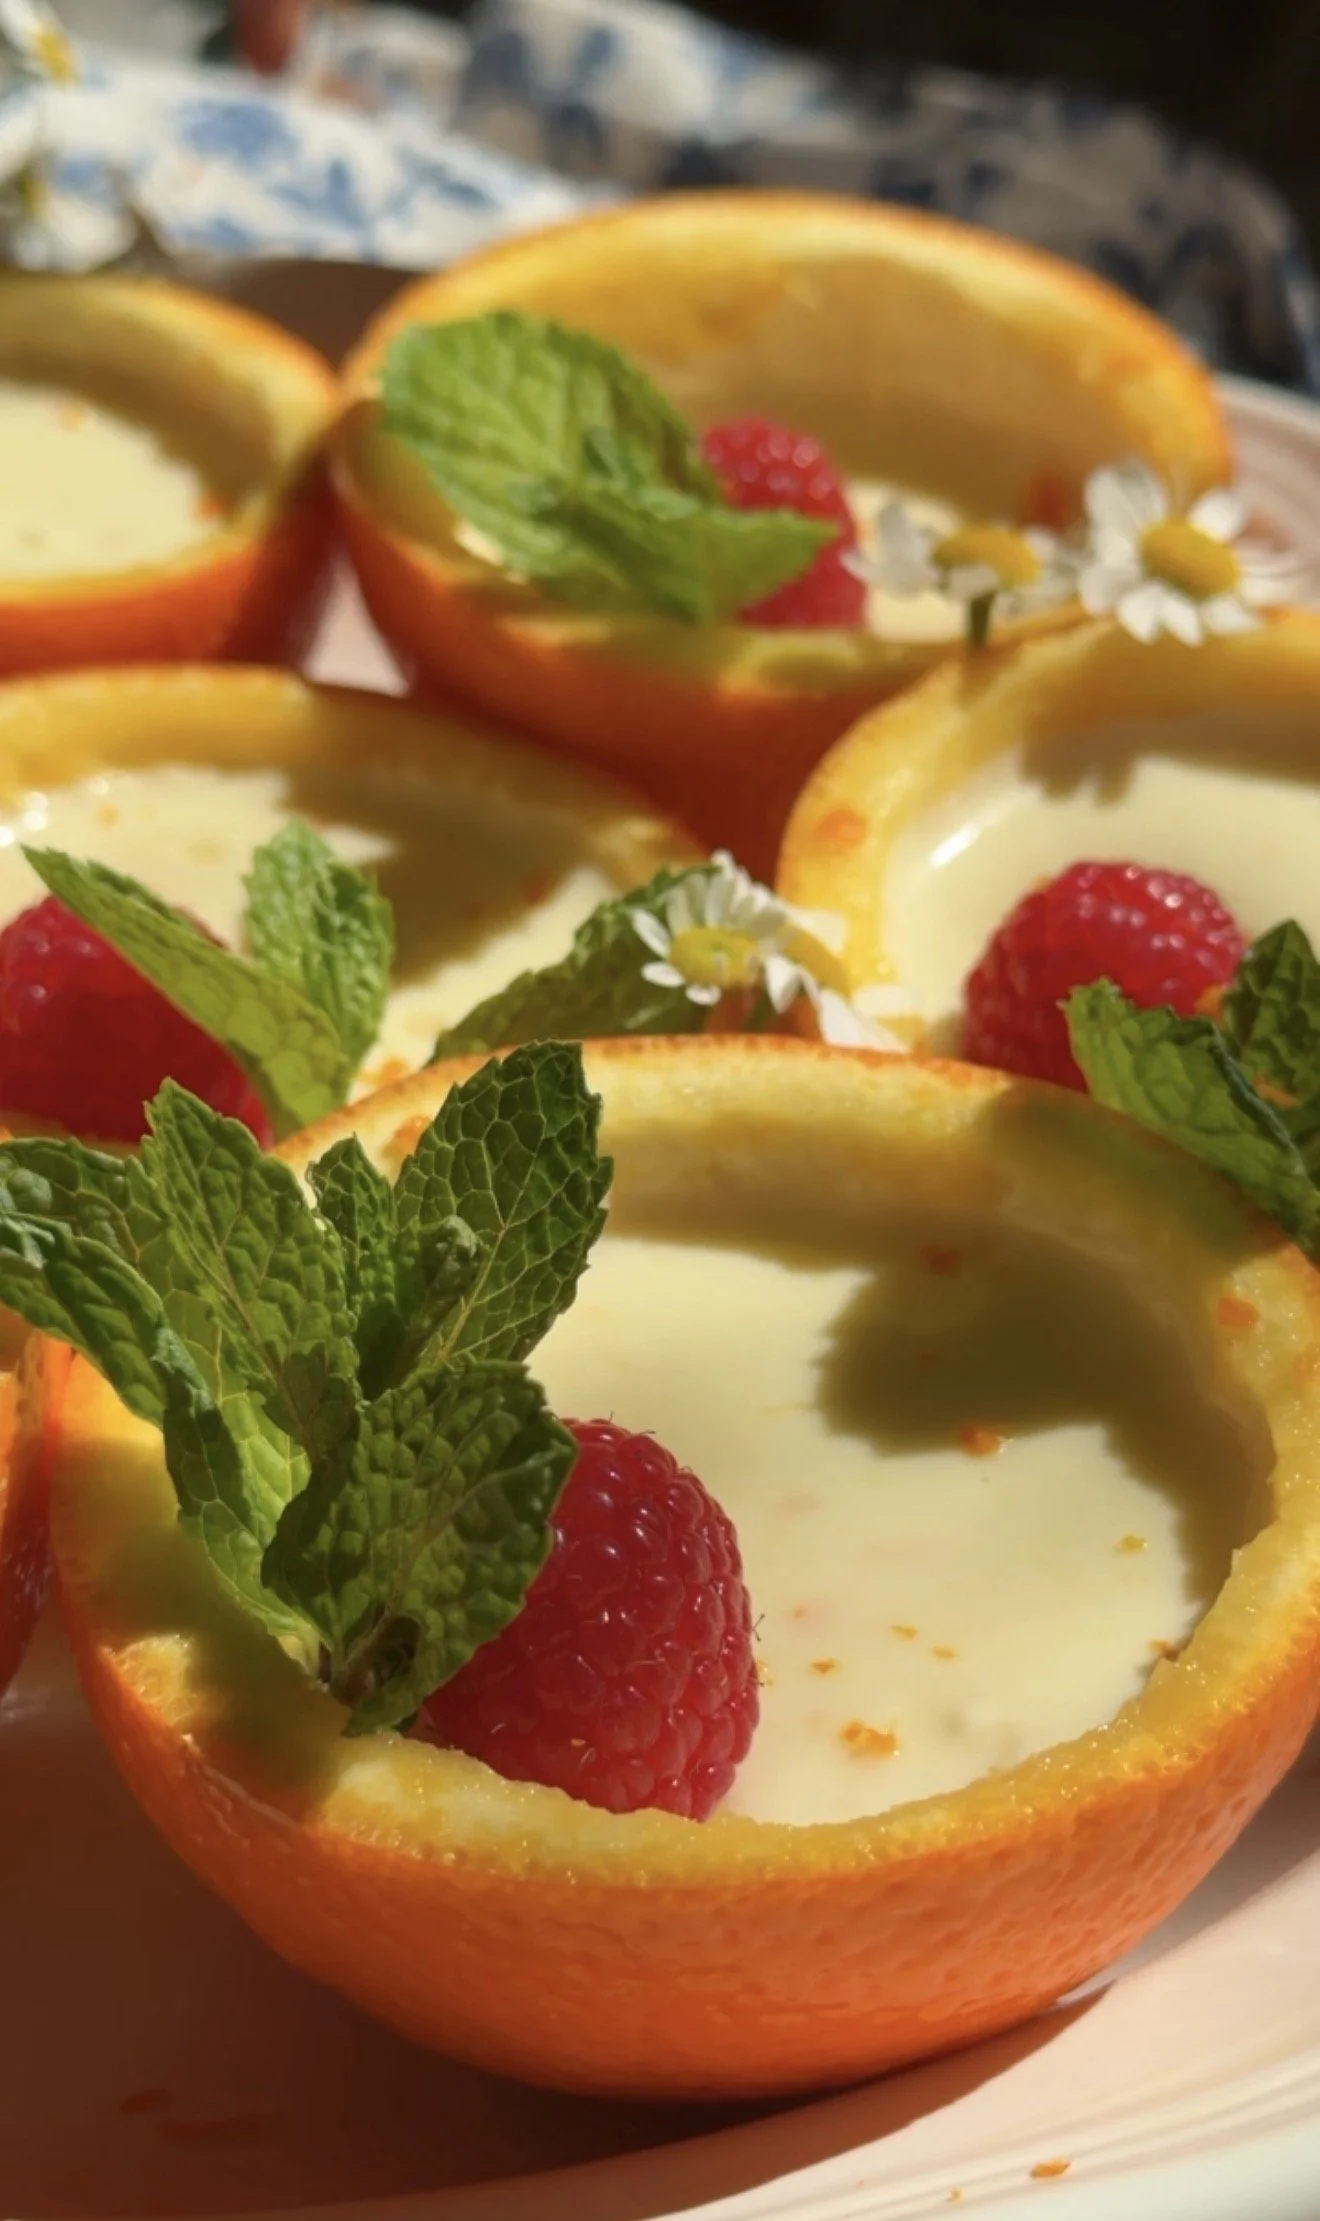
The cousin to my lemon posset! The orange gives them a softer, slightly sweeter citrus flavor compared to lemon, with just enough brightness to keep them from feeling too rich. As they chill, they set into this light, custard-like texture that feels simple but really satisfying.
I love making these when I want something that looks elegant without a lot of work. You can pour them into little glasses or bowls and let them set in the fridge, and they come out looking so clean and pretty.
Ingredients
For the orange posset
2 cups heavy cream
¾ cup granulated sugar
½ cup fresh orange juice (about 3–4 oranges)
1 tbsp fresh lemon juice (optional but recommended for brightness)
1 tsp finely grated orange zest
For garnish
Fresh raspberries
Mint leaves
Chamomile flowers
Instructions
Prepare the orange cups (optional)
Slice oranges in half and carefully scoop out the flesh, leaving the peel intact to create small bowls. Set aside.Heat the cream and sugar
In a saucepan, combine the heavy cream and sugar. Bring to a gentle boil over medium heat, stirring occasionally.Simmer
Let the mixture simmer for about 3 minutes, stirring often.Add citrus
Remove from heat and stir in the orange juice, lemon juice, and orange zest.Pour the posset
Carefully pour the mixture into the hollowed orange halves, or into glasses, ramekins, or teacups.Chill
Refrigerate for at least 2 hours, or until the posset is softly set.Garnish
Top with raspberries, mint, and chamomile just before serving.
Make this with me!
Everything I Used:
This post may contain affiliate links, which means I may earn a small commission if you purchase through them, at no extra cost to you.
My favorite scalloped plates: https://go.shopmy.us/p-50457676
Browse More Recent Recipes